We all are aware that WordPress is the most popular Content Management System (CMS) as it powers 28% of the websites around the globe. The Multisite feature of WordPress is becoming quite popular nowadays. Many of you might be aware of this feature but to some, it is still a new thing. Well, in this blog post we will be sharing few things about multisite such as what is “Multisite” feature, how it is different from regular WordPress, how it is beneficial to enterprises, etc.
WordPress Multisite Development
The multisite feature of WordPress allows the user to manage multiple sites from a single access point. It creates a network of sites on a single installation of WordPress. In other words, one can control the users, features, functionalities, styles, etc. with a single sign in. It was first introduced with the release of WordPress version 3.0.
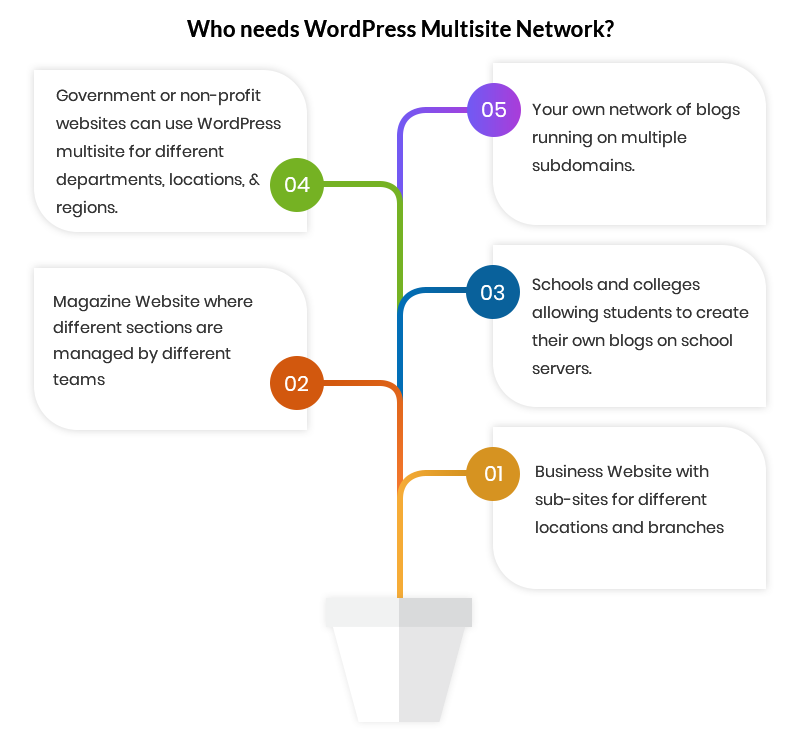
Depending on the goals and objectives of your business, you can opt for WordPress Multisite development for your Website.

How Multisite is different from regular WordPress Installation?
Multisite installation is different from regular WordPress installation in a way that there have to be some changes incorporated in wp-config.php file and wp-uploads folder.
The wp-config.php file requires some extra lines of code to be added to it, in order to activate the Multisite feature and requires checking as to how it is running.
The wp-uploads folder contains subfolders for each site on the network and they are named as sites’ numerical ID.
These subfolders contain the files that are uploaded to each site. This will be stored in the same structure as they are stored in a wp-uploads folder in standard WordPress installation. Here, WordPress automatically manages the file structure.
Further, the Multisite feature is different from the standard installation based on the database. The database for standard WordPress installation has 11 tables and for Multisite network, 9 of the 11 tables are duplicated for each site. This infers that if a network consists of too many sites, then the database will have a lot of tables; keeping the content for each site separate.
Let us now briefly understand, how multisite features can be implemented for your websites.
Activating / Implementing Multisite
Multisite can be implemented for any organization based on whether the site is brand new or an established one. It also depends on whether the site owner wishes to use subdomains or subdirectories for the different sites in the network. Let us explain to you,
1. Using Subdomains:
- When you use subdomains for your multisite network, a separate URL will be created for each site. For instance, like this http://site1.multisitenetwork.com. In case you wish to allow people to create their own site, you need to activate wildcard subdomains for your hosting.
2. Using Subdirectories:
- When you use subdirectories for your multisite network, each site will have a network. For instance, like this
http://multisitenetwork.com/site1. An important thing to note here is that this option can’t be used with an already established website because it might cause clashes with the already created URLs on your website.
If you wish to activate Multisite feature in new WordPress Installation, you can follow the steps as below:
At first, install WordPress in a normal way by downloading WordPress and installing it on the server or local machine. After that, open wp-config.php file. This file is located in the same folder where WordPress is installed. Find the line which reads below:
/* That's all, stop editing! Happy blogging. */Above this line, add the line which reads as follows:
define( 'WP_ALLOW_MULTISITE', true );Now save your wp-config.php file.
Next, go to the WordPress admin screen and install Multisite. For installation, follow the below steps:
- Go to the WordPress admin panel. Go to Tools > Network Setup. A prompt will be shown to make a choice between subdomains or subdirectories, where you have to decide which will best suit your network.
- Another prompt will be shown where you can edit the network title and email address of the administrator. If you don’t wish to change, leave them as they are.
- Now click the install button.
- After installation, copy the code given by WordPress to
wp-config.phpand.htaccessfiles. - After this, the Network install screen will appear. you have to open each
wp-config.phpand.htaccessfiles and edit them according to the text provided on the screen. If you are not able to locate the.htaccesson your server, try changing the settings in your code editor in order to access your files. - Save both the files.
WordPress Multisite installation will be a success. You are supposed to log in again, where you will be able to view the Multisite dashboard.
After this, you can add sites, plugins, themes, etc.
If you wish to activate Multisite on established WordPress, you need to follow the same steps as for the new installation except you won’t be given the choice for selecting subdomains or subdirectories. And if the site is older than a month, then you will be forced to use subdomains. For more information refers to the official guide for Multisite.
Advantages of using WordPress Multisite
The Multisite feature of WordPress has many advantages. We are listing a few:
1. A blog for multiple sites can be managed with a single login
- The WordPress Multisite development feature allows the site owner to manage the blogs in an efficient manner with a single sign in. It has become easier for the authors and website administrators to access different blogs with a single drop-down menu inside the WordPress admin bar.
2. Easy sharing of Plugins and themes
- Multisite allows the sharing of plugins and themes with all the other sites in the network. You can do it all at once for the original site and the subsites. Site admin can install Plugins which can easily be shared by all.
3. Shared Users
- Sometimes, Multiple WordPress installs and creating duplicate users for every site can be a bit boring. This can be easily done with the help of WordPress Multisite, which helps in managing the users providing each one the permission to access the site that they wish to use. The User settings also give an option of granting access to one site or multiple sites to a particular WordPress User. Simultaneously, the permission levels can also vary.
4. Advanced Setting Feature
- With the Multisite feature, you can make quick changes and implement the changes accordingly in all the blogs that you manage. This feature is a unique one allowing the site owner to see everything from one place. This could be complicated for some but it is an efficient approach to deal with all your websites.
Conclusion
WordPress is one of the most popular CMS worldwide. With the introduction of WordPress VIP, it has catered to the enterprise-level requirements of the organization. It has helped them to develop robust solutions to take their organization to the next level of progress.
We at Multidots have helped famous brands to make a seamless shift to WordPress VIP and WordPress Multisite Development. We can assist you in creating a robust solution based on WordPress according to your requirements.


AnkitJune 1, 2018 at 12:46 pm
Nice Article Thanks For Sharing…
Webs TechnologyJuly 10, 2018 at 7:50 am
Thanks for sharing. Its helpful article.
Topic WordPress DevelopmentJuly 23, 2018 at 1:01 pm
WordPress is growing continuously and making their features more advance. This is one more achievement in their huge collection of features and plug ins. Thank you for sharing the details and implementing information. Really appreciated.